Wednesday, August 29, 2012

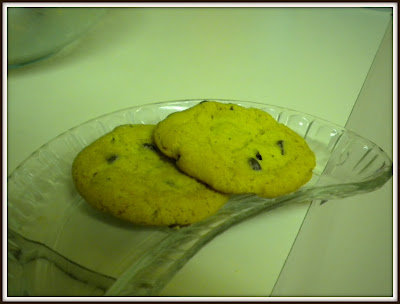
Chocolate Chip Cookies


I have been searching, and searching, and searching, and searching (that's four years of searching!) for the PERFECT chocolate cookie recipe, but the wait has most certainly been worth it!  I finally found this recipe labelled as "The Only Chocolate Chip Cookie Recipe I Will EVER Need to Know How to Make for the Rest of My Life!"---really?  A glimmer of hope shone through.  I just had to try!  Needless to say...  They will be the only recipe I ever need to know!  HOWEVER---they do take some PATIENCE because you have to refrigerate them for at least 24 HOURS!!!!!!!!!!

I modified it from the original mainly because I love chocolate, but it was too much the first time!  Other than that, the recipe was left alone.  Cake flour is necessary for this recipe. I've been able to find it in grocery stores usually on the very bottom or top shelf; the only brand that I've ever seen is Swan's. It's in a red box.

PERFECT Chocolate Chip Cookies

About 24 cookies (unless you have a dough-eating addiction like I do...)

2 cups minus 2 Tbsp. (8 ½ oz.) cake flour
1 2/3 cups (8 ½ oz.) bread flour
1 ¼ tsp. baking soda
1 ½ tsp. baking powder
1 ½ tsp. coarse salt, such as kosher
2 ½ sticks (1 ¼ cups; 10 oz.) unsalted butter, softened
1 ¼ cups (10 oz.) light brown sugar
1 cup plus 2 Tbsp. (8 oz.) granulated sugar
2 large eggs
2 tsp. vanilla extract
12 oz bittersweet chocolate chips or chunks, preferably about 60% cacao content
Sea salt or kosher salt for garnishing
  1. Combine flours, baking soda, baking powder, and salt in a bowl. Whisk well; then set aside.
  2. Using a mixer fitted with paddle attachment, cream butter and sugars until very light and fluffy, about 3 to 5 minutes.
  3. Add the eggs, one at a time, mixing well after each addition.
  4. Mix in the vanilla. Scrape down the sides of the bowl with a rubber spatula as needed.
  5. Reduce the mixer speed to low; then add dry ingredients, and mix until just combined. **VERY IMPORTANT: you DO NOT want to overmix the dough.  Literally until just combined (as in you can still see patches of flour).**
  6. Add the chocolate chips, and mix briefly to incorporate.
  7. Press plastic wrap against the dough, and refrigerate for 24 to 36 hours. The dough may be used in batches, and can be refrigerated for up to 72 hours.  Dough can be frozen up to 3 months.
  8. When you’re ready to bake, preheat oven to 400°F.
  9. Remove the bowl of dough from the refrigerator, and allow it to soften slightly.
  10. Line a baking sheet with parchment paper or a nonstick baking mat.
  11. Using a standard-size ice cream scoop--about 1/3 cup--scoop six mounds of dough onto the baking sheet, making sure to space them evenly. *If dough gets soft, stick back in the fridge for 30 minutes.*
  12. Sprinkle lightly with sea salt, and bake until golden brown but still soft, 15 minutes.
  13. Transfer the baking sheet to a wire rack for 10 minutes, then transfer the cookies onto the rack to cool a bit more.
  14. Repeat with remaining dough. 
  15. Try not to die when you eat a cookie!!!
{See the patches of flour still?  That's 'until just combined' because you still have to add chocolate chips so you will be stirring some more!}

Go make some!!!  NOW!
Pin It

Friday, August 24, 2012

Peach-Blackberry Crumble

The farmer's market has been flooded with peaches!!!  I love peaches, and just eating plain is good enough for me!  However, sometimes my eyes are bigger than my stomach (or Ben can't handle eating sweet foods for a spell), and I am stuck with peaches that are close to expiring!  Oh no!!! 

So I pulled out the ol' recipe book and gave it a flip through and came across my Strawberry-Rhubard Crumble recipe I made in June--EUREKA!  I had frozen blackberries in my freezer (that my wonderful future father-in-law picked for us!)--I'll make Peach-Blackberry Crumble with cinnamon and almonds added! 


So I used the crumble recipe replacing the strawberries and rhubarb with peaches and blackberries.  I added 1 teaspoon cinnamon and 1/2 cup of sliced almonds to the topping.  The result was DELICIOUSNESS!!!  (Sorry for no picture of the final result--I was in a hurry and the crumble was eaten within 12 hours of it's making LOL).

Pin It

Tuesday, August 21, 2012

Peach Sangria

Ahhh peaches!  A nice warm, ripe peach on a hot summer day is just heaven.  Ben and I love peaches so I have been buying them like a crazy-person (have you noticed that I am a bit crazy when it comes to food?).  I had just bought six peaches at the farmer's market when I saw this peach sangria recipe at my new favorite blog, The Shiksa in the Kitchen, and knew I had to make it!  Not only did I have a bottle of peach schnapps just sitting in my closet (I don't really make many cocktails, and it was left over).  Thanks to the best friend, I had tried a moscato (sweet white wine) which I don't usually drink since I am a dry, red wine person. 

{A refreshing glass of sangria on a hot day!}

My mom just moved into a new house, and I brought this over as a house-warming gift of sorts.  This drink was very refreshing and peachy!  It's definitely one of my favorites, and it really couldn't be easier to make! 

{Fresh peaches}

{Use a sweet wine to make this recipe}

{Allow it to set overnight so the peaches infuse flavor}

Peach Sangria (Alcoholic)

Ingredients

3 large fresh yellow peaches, sliced
1/4 cup sugar
1/2 cup water
3/4 cup peach liqueur or peach schnapps
1 bottle moscato white wine
1 liter ginger ale, chilled
  1. Place the sliced peaches into the bottom of the sangria pitcher.
  2. In a small saucepan, bring 1/4 cup of sugar and 1/2 cup of water to a boil. Stir until the sugar dissolves completely. Remove from heat and let it cool. This is your simple syrup.
  3. Pour the simple syrup, peach liqueur and white wine over the peaches. Stir.
  4. Place the pitcher in the refrigerator and let it sit for at least 2 hours, up to overnight.
  5. When ready to serve, top the pitcher off with chilled ginger ale and stir gently.
  6. Serve in wine glasses, allowing a piece of fruit or two into each glass.
To make this non-alcoholic simply replace the white wine with white grape juice and the liqueur with peach juice.

What is your favorite summertime drink?

Pin It

Sunday, August 19, 2012

Roasting Vegetables

I love roasting vegetables.  The flavors change and become softer and sweeter.  I especially love fall and winter when roasting vegetables keeps the kitchen nice and warm with great smells wafting from the oven... *sigh*  Did I mention I love fall?  (This weather is also not helping my obsession with all things fall!)

My family loves tomatoes, and between my grandparents and future in-laws, I have no shortage of tomatoes for my enjoyment.  I am currently drowning in tomatoes, and so instead of trying to eat them all, I have turned to roasting them and freezing them.

{Yummy roasted tomatoes!}

Roasting any vegetable is easy: clean the vegetable, cut to desired thickness, drizzle in olive oil, sprinkle salt and pepper on it, and roast at 400 degrees until tender and carmelized.  Then use or store.

Tomatoes are a bit special: cut an X into the bottom so the skin is easier to peel off (see how some of the skin is falling off?  That means it's done); then pull off the peel and use or freeze.  Easy! 

Now I have roasted tomatoes that I can do anything with--add them to a roasted vegetable and quinoa salad (coming later on in the fall!) or add them to spaghetti sauce or make sloppy joes or make pizza sauce or make ketchup or goulasch--the possiblities are endless!  (I'm a bit excited, can't you tell?)

So go to the garden or farmer's market and start roasted and storing some of those delicious vegetables that are plentiful at the moment!
Pin It

Monday, August 13, 2012

Ikea Bread

Who loves the smell of baking bread?  EVERYONE!  Although Ben and I can't afford to buy organic food (I wish that we could!), I try to do the next best thing which is to make EVERYTHING we consume from scratch to reduce the ingestion of preservatives and chemicals.  So I am on a mission to find a bread recipe (without using a bread machine) that is fool proof and easy beyond belief. 

{Good, solid, hearty bread!}

Soooo I found this bread-mix-in-a-box at Ikea (I'm obsessed!) that has no chemicals or preservatives; plus, it is LOADED with grains, seeds, and whole wheat.  All the you have to do is add water, shake, pour, rise, and bake.  I had to take it home and try it!

{Easy--just add water!}
The mix cost only $5 for the box and made a beautiful loaf that Ben and I can't get enough of!  It reminds me of the bread I used to eat in Germany: hearty and heavy.  Cheap: check.  Easy: check.  Delicious: double check!

{Ready to go in the oven}

Unfortunately, the closest Ikea for Lexington is in Cincinnati, but I make the trip once or twice and buy at least 6 boxes to hold me over until I can make a trip again! 

Do you make your own bread?  What is your favorite bread?

PS--I am working on another from-scratch recipe for our bread so stay tuned!

Pin It

Friday, August 10, 2012

Spice It UP!!! Quinoa

Welcome to my Spice It UP series!  This series is to help my {WONDERFUL} readers add variety and spices (literally!) to their cooking.  I'm very excited to start this!

First up is my FAVORITE grain of all time!!!  I generally don't eat grains/pasta/bread for weight reasons, but I do eat quinoa every once in a while.  A little history on quinoa:

Quinoa (pronounced KEEN-WAH) is native to South America.  This super-grain is very nutrient dense and is the only grain that has all nine essential amino acids.  It provides a variety of antioxidant phytonutrients; antioxidant flavonoids are also especially plentiful in quinoa.   Quinoa has many anti-infammatory porperties and is a good source of vitamin E. 

Quinoa is a very good source of antioxidant-promoting manganese.  It is also a good source of heart-healthy magnesium, folate, and fiber, as well as bone-building phosphorus and copper.  However, this grain does have a higher fat content so make sure you watch that portion size!  Quinoa is cheap and gluten-free, and it cooks FASTER than rice or other grains!  The taste is slightly nutty and earthy.  Source and Source


Quinoa can be used in place of any grain in a recipe. I do recommend that you at least rinse before use since it naturally comes with a bitter coating called saponin. Most quinoa that is bought in the U.S. has been pre-rinsed and dried, but it never hurts to be sure!


Quinoa

Serves 2

Ingredients

1 cup quinoa, rinsed
2 cups chicken broth (you can use beef broth or water)
1/2 onion, diced*
2 cloves garlic, minced*

  1. Place all ingredients into a saucepan.
  2. Turn the saucepan to medium-high heat.
  3. Place lid on pot and cook for 15 minutes or until quinoa has "popped" open (seriously--it looks like popcorn!).
  4. Fluff with a fork.
  5. Serve, mix into a salad, or save some for another day!
*I put onions and garlic in everything--these can be left if you choose!)


Quinoa Pilaf

Serves 2

Ingredients

1 tablespoon olive oil
1/2 onion, chopped
2 cloves garlic, minced
1 cup quinoa, rinsed
2 cups chicken broth
1 bay leaf

  1. Sweat (means no browning!) onions and garlic in the olive oil until clear and fragrant on medium heat.
  2. Add quinoa and stir to coat in the oil.  
  3. Saute quinoa for 2 minutes.
  4. Add broth and bay leaf and turn the heat to medium-high. 
  5. Place lid over quinoa and cook for 15 minutes.
  6. Fluff with fork when quinoa is "popped" but firm.
  7. Season to taste with salt and pepper.
  8. Serve.

I substitute quinoa for just about everything.  In fact, one of my favorite ways to eat quinoa is in Tabouli which is usually made with bulgur or couscous.  (I LOVE Mediterranean/Middle Eastern cuisine!)


Quinoa Tabouli

Serves 4

Ingredients

1 cup quinoa, rinsed
2 cups chicken broth
2 cups parsley, chopped finely
1/4 cup chives, chopped finely (green onions or regular onions work too)
2 cloves garlic, minced
1 large tomato, diced
1/2 cucumber, diced
3 tablespoons lemon juice
3 tablespoons olive oil
  1.  Mix quinoa and chicken broth in a saucepan; turn to medium-high heat and cook for 15 minutes, or until done.  Fluff with fork, and set aside to cool.
  2. Meanwhile, mix the remaining ingredients together.
  3. When quinoa has cooled, add to parsley mixture.
  4. Add salt and pepper to taste.
  5. Allow the salad to set at least 1 hour but best if allowed to set over night.

I have seen recipes for quinoa burgers and pudding and salads (I have them on the list!) and just about anything else imaginable!  Quinoa also is ground into flour to be substituted in baked goods.  I have not attempted to bake with quinoa flour because it has only recently hit my shelf, but when I'll definitely try it out in the future!

Some sources for more quinoa recipes are here and here.

I haven't seen quinoa in main stream stores (unless they have a very large organic/all natural/health food section), but I can get them at my local co-op/health food store.  Quinoa comes in white (most common and cheap) and red (more expensive) varieties.  I have used both; the red requires a bit more cooking time (about 20 minutes), but other than that, they are similar.  I have seen a company (can't think of the name) starting to make pasta and such out of quinoa for those with gluten allergies; in fact, I have had the spaghetti, and it's really delicious! 

Are you intrigued?  I urge to go and try it!  My finicky/picky hubby-to-be even loves quinoa! (seriously!)  Have you had it before?  Tell me what you think of it!

Pin It

Wednesday, August 1, 2012

Watermelon Feta Salad


Summer is so full of fruits and vegetables!  (The one perk of summer---sorry guys!  I'm a fall/winter girl)  Watermelon HAS to be the fruit of summer.  I mean really---who eats watermelon in December?  Exactly!

{I set out the watermelon, turned my back, and found a hunk missing--turns out Ben could eat it 24/7}

No offense--but I get a bit tired of having watermelon straight up or in a fruit salad.  I saw this recipe along with several others, and I decided to give it a whirl!  Ben gave me funny looks, and I am positive that my family chuckled when I told them I was bringing it for our weekly meal.  However, everyone said that it was delicious!  Lesson learned--Don't judge a recipe by it's ingredients!


Watermelon Feta Salad

Serves 4

3 cups watermelon, cubed into bite sized pieces
1/2 cup feta cheese, crumbled
1/2 cup olives, sliced
1/4 cup fresh basil, chopped
1/4 cup fresh mint, chopped
1/4 cup red onion, thinly sliced
3 limes, juiced
1/2 cup olive oil
dash of kosher salt
3/4 teaspoon black pepper

  1. Place first 6 ingredients in a bowl.
  2. Whisk together the lime juice, olive oil, salt and pepper.
  3. Pour dressing over salad.
  4. Toss and serve.
  5. This can be made the night before.  However, the salt and the citrus will draw out the juices in the watermelon so bottom of the bowl will be full of juices. This is normal and will not affect the flavor.
Yup--it's that easy.  If you are still telling me I am off my rocker--go grab some watermelon and just put the dressing on it.  I'm telling you---a different spin on everyday food brightens it up!Pin It

Printfriendly